But Wait, There's More!
- Abigail Weeks
- Jun 23, 2018
- 4 min read
Updated: Jun 27, 2018
With the concrete curing for the next few days, the team is using our time to finalize our
plans for our remaining time in Kalinchok. We are doing everything possible to ensure the continued maintenance and sustainability of our now implemented project and to lay the foundations for the success of EWB’s future projects here. Now that our construction is all but wrapped up, Emily has taken the time to write up a summary of the system and work done. Here’s her explanation:
The EWB Nepal team traveled to Kalinchok armed to build a tap stand. We had CAD designs in our folders, 1/2” GI pipes in our bags, and an unbreakable spirit.
The carefully planned designs had planned to connect our tap stand to an existing pipe that lay on the ground. However, as soon as we arrived at the site, we quickly got a crash course on the water distribution infrastructure of Nepal. In short, water systems consist of pipes laying on the ground sprawling the terraces that generally carry water from an inaccessible source to a more convenient location. If anyone else needs water, they cut into the exposed pipe and coax the water in the desired direction. If a pipe bursts, plastic trash is used to seal the pipe, and if you need to connect pipes together, you shove one pipe into the other, cover the joint with a couple rocks, and hope it holds.

The team realized that we could not implement an effective, reliable tap stand with this pipe on the ground, spewing water off the next terrace. Not only was there not enough flow through the pipe, it also had numerous leaks and was completely unprotected from people cutting into the line and disrupting the water supply to the tap stand. It was clear that if we wanted to build a tap stand that would work reliably for at least a couple years (the existing tap stand worked for a total of two days before its water supply was cut off), we would have to fix the water distribution system to the school and adjacent community to ensure not only that our tap stand had reliable water, but also that the surrounding community had water as well, reducing anyone’s motivation to break into the school line for water.
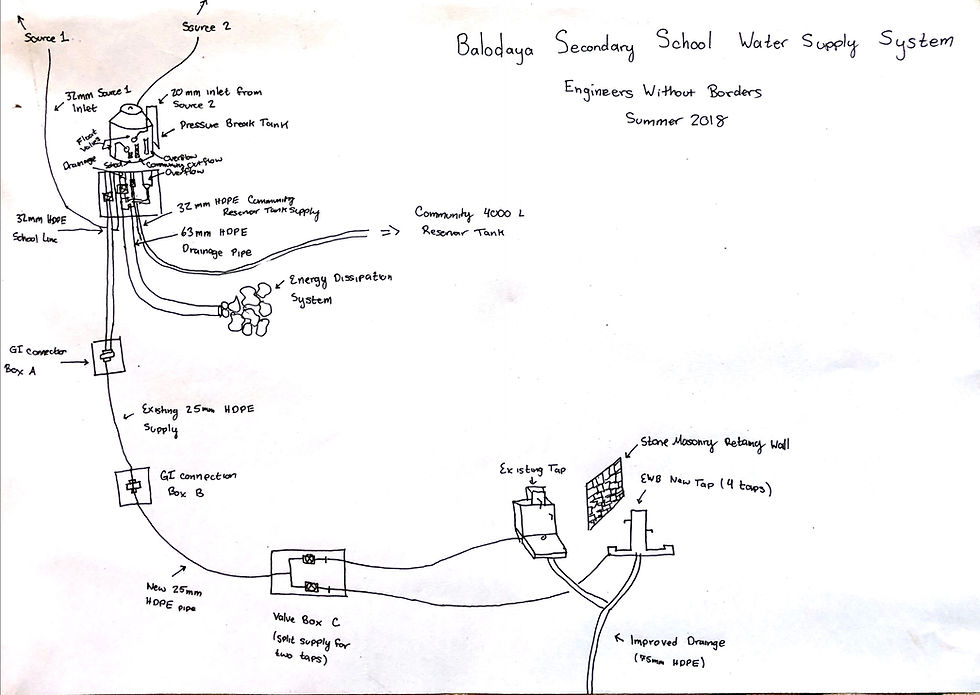
Our group of soon to be expert plumbers sprinted toward the challenge at full speed. We tackled the water distribution system at three primary sites: the pressure break tank, the piping to the school, and the tap stands.
Pressure Break Tank


This tank, located about 100m above the school, collected water from a spring source and distributed it to the school and a community reservoir tank. The drain and overflow valves were capped off (rendering them utterly useless) and the valve to the reservoir tank was broken, so no water was getting to the community.
Our first point of action was to trade out the 25mm HDPE pipe connecting the tank to the school with a 32mm HDPE pipe in order to increase water flow to provide water to both tap stands. We also connected an additional source to the tank, drilling a hole and installing a float valve for an inlet that had previously passed the tank in a lose 20mm HDPE pipe on the ground.


Additionally, we installed a drainage system complete with 30 meters of 63mm HDPE and an energy dissipation system to prevent erosion of the path. This system connects the existing drainage and overflow pipes and adds a valve to the drainage. This will make it easier to drain, maintain, and clean the tank as well as prevent overflow from the sources when flow is high. We also installed float valves on the inlets to shut off flow when the water level in the tank got too high. To keep any leaves or other gunk from clogging the newly installed pipes we installed strainers on both the community and school lines. This will hopefully prevent people from having to cut into pipes to try and find clogs (or small rodents) in the water pipes.
The Piping
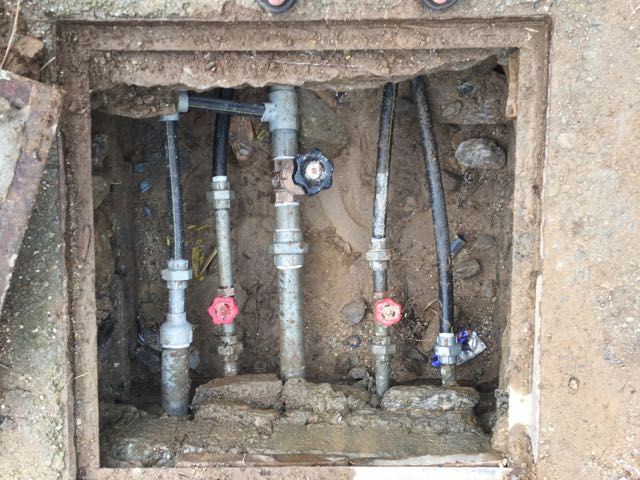
We replaced over 150 meters of pipe and installed 3 junction and valve boxes on the way from the tank to the school. We replaced the typical Nepali pipe junction, shoving a slightly smaller pipe in a slightly bigger pipe and sealing the connection with plastic biscuit packaging, with GI unions and pipe tape (the number one tool in our tool box). These stone masonry boxes protect the GI unions from degrading in the soil and make it easy to check connections and turn off water for repairs later on the line.


We dug two-foot deep trenches to lay the pipes and buried them under mounds to protect the paths from erosion from the rain that regularly pours down the hills, stripping away the dirt.
The Tap Stands
When we first arrived at the school, the existing tap stand wasn’t functional. It had been built five months ago by another NGO and worked for a total of two days before grinding to a halt. The kids had been relying on a broken pipe spanning the field for water. The original plan had been to knock it down and build a new one. We went to the tank, unclogged the line, and Voila! The school had a working tap stand. We altered our design to account for the additional tap stand, building only four taps instead of six.

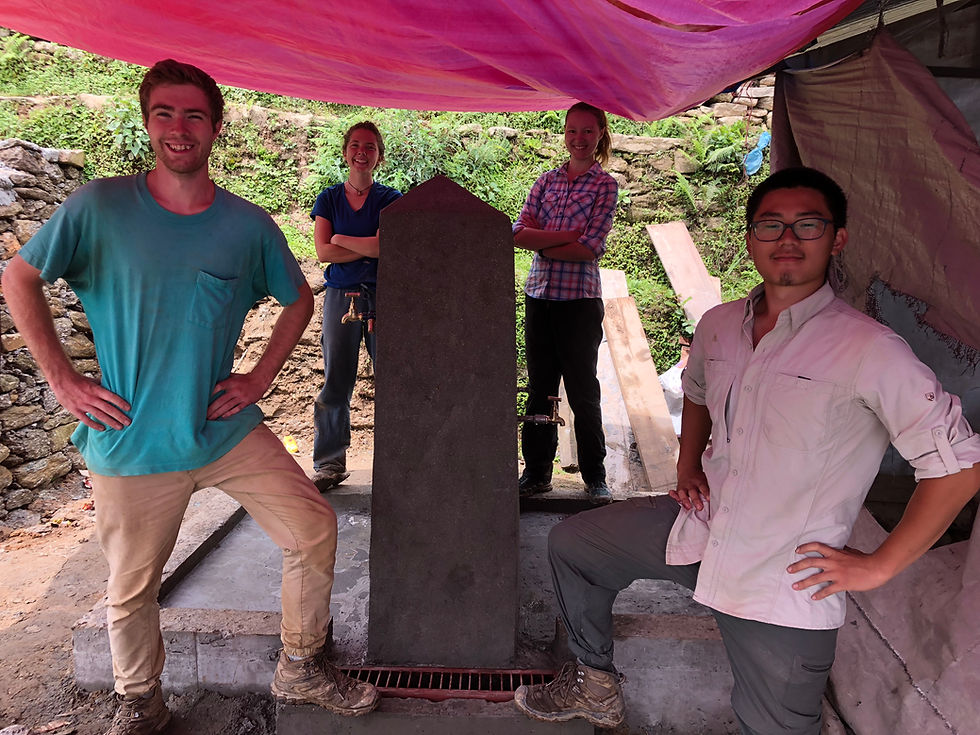
The desired location of our new tap stand required that we excavate large mounds of dirt leftover from the construction of a temporary learning center. This excavation required that we learn how to handle a pickaxe and build a large stone retaining wall (a Nepali specialty).
We also installed an improved drainage system for both tap stands. The existing drainage system consisted of an eroded, uncovered trench that ran across the foundation of the latrines and dropped precipitously off a terrace. We buried a set of HDPE pipes to carry the drainage from the tap to an appropriate runoff location that would not threaten the stability of any buildings or terraces. We also installed drain covers to keep anything the kids might throw down the drain (shoes, biscuits wrappers, etc.) from clogging up our new system.

The project expanded quite a bit from our initial plans, but after a lot of hard work and guidance from Lisa, we feel confident in what we’ve done as a team.
-Emily
Comments